A VELUX flashing kit is the set of metal pieces that makes the join between a roof window and the roof covering watertight. The window frame gets most of the attention, but the flashing is what stops rain getting past the edge. This guide explains what is in a kit, how the right one is chosen, and why it should be ordered with the window and never as an afterthought. It supports our wider page on VELUX windows in Brighton and Hove.
What a flashing kit actually is
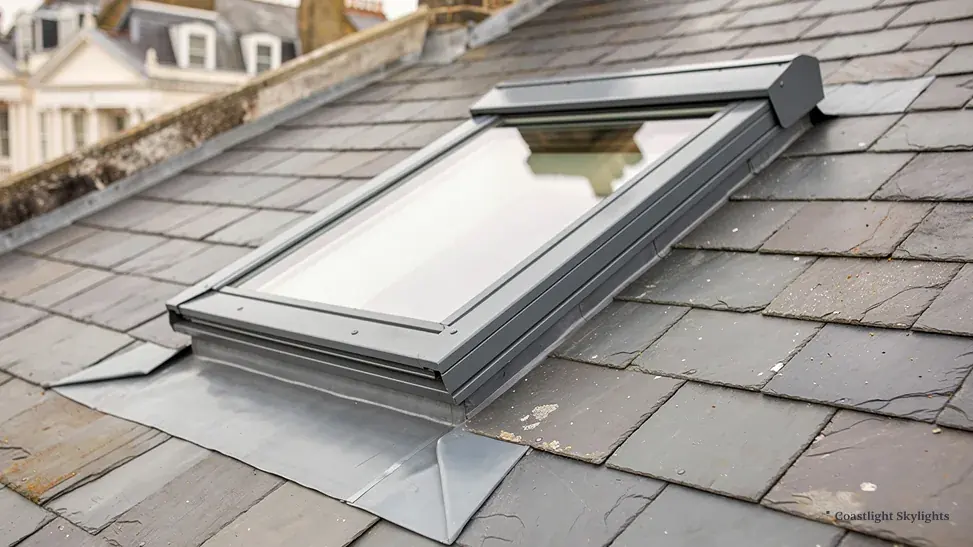
When a roof window sits in a pitched roof, the tiles or slates stop short of the frame on every side. Something has to bridge that gap and shed water onto the roof covering around it. That something is the flashing. It is a made-to-fit surround, usually aluminium with a coating, that wraps the four edges of the frame and tucks under or over the roof covering depending on the side.
The kit is sold for one window size and one type of roof covering. It is not a universal part. A kit made for a profiled concrete tile will not seal against a thin natural slate, and a kit for a different window size will not close around your frame. This is the first thing to understand about any VELUX flashing kit: it has to match both the unit and the roof.
The pieces are cut and folded to interlock. Along the bottom edge there is an apron that sheds water over the tiles below. The two sides have gutters or soakers that carry water down past the frame. The top has a cover piece that sits under the tiles above and throws water to either side. Each piece depends on the others, so a kit is installed as a set, in a set order.
The parts in the box
The exact contents change with the model, but a standard single-window kit includes these items.
- Bottom apron. Sheds water forward onto the roof covering below the window.
- Side flashings. Run down each side of the frame and lap over or under the adjoining tiles.
- Top flashing. Closes the head of the frame and directs water around it.
- Fixings and seals. Brackets, screws and the sealing strips that go between the frame and the metalwork.
Alongside the flashing, most installations also use a collar for the underlay and, in many cases, an insulation collar. These are separate parts that deal with the waterproof layer under the tiles and the thermal gap around the frame. They matter just as much as the visible metalwork, because a badly lapped underlay can let water in just as surely as a flashing you can see from the garden.
Matching the kit to your roof covering
VELUX sort their kits by letter code, and the code tells you which covering the kit is built for. The codes are printed on the box and in the price lists, and your surveyor will read them off against what is actually on your roof.
| Roof covering | What the kit must allow | What the survey checks |
|---|---|---|
| Profiled tiles | A raised profile that the side gutters can sit over | The height of the tile profile |
| Plain tiles | Soakers interleaved with each tile course | The tile gauge and the courses beside the opening |
| Natural or fibre slate | A flat covering with the flashing lapped under it | Slate thickness and the state of the nail fixings |
| Pantiles and other deep profiles | A kit rated for a deep wave | Whether the profile is within the kit's limit |
| Metal or flat sheet | A kit made for a smooth covering | Sheet type and how the seams run |
You do not need to learn the codes. What matters is that the order is made from a measured roof and a confirmed covering, not from a guess made at ground level.
Why the tile profile height matters
A profiled tile has a rise and fall across its width. The side gutters of the kit have to clear that rise, and the kit is designed for a maximum profile height. If your tile is deeper than the kit allows, the flashing cannot sit flat, the gutter ends up fighting the tile, and a gap opens up that rain will find.
This is why we measure on the roof. Reading a tile type from the street is not enough, because two tiles that look alike from below can have different profiles. Where a roof has been re-covered at some point, one slope can carry a different tile from the next. The survey records the covering on the slope the window will actually sit in.
Slate roofs and the soaker question
Slate is where a flashing kit asks the most of the person fitting it. Because slate is flat and thin, the water is carried by the lap of the slates themselves, so the kit has to be integrated into that lap. Slates around the frame are cut and fitted so that each course overlaps the metal on the correct side. A rushed slate job leaves a slate sitting proud of the flashing and sheds water inwards.
Older slate roofs add a further difficulty. Nail fixings may have corroded, and the slates beside the opening may be brittle. When the opening is cut, adjoining slates can crack or slip. We check the condition of the surrounding slate at the survey, and the written quote says whether any slates around the new window need replacing so that the flashing has sound material to seal against.
Single windows, pairs and combinations
A single window uses a single kit. When two windows sit side by side, the kit changes. Windows set next to each other need a connecting flashing between the frames, and windows set one above the other need a different arrangement, with the upper window's apron lapping the lower window's top flashing. These combination kits are designed for a defined gap, so the spacing between the windows has to be right before the openings are cut.
This is a decision for the survey, not the day of the job. If you are planning two windows, tell us at the start. The framing in the roof, the rafters that must be trimmed, and the choice of flashing all follow from the spacing. Getting the gap wrong by a small amount can mean a standard combination kit no longer fits.
Where the underlay collar fits in
Under the tiles, the roof has its own waterproof layer, the underlay or breathable membrane. When a window goes in, that layer has to be cut and then closed back around the frame. The underlay collar is the part that does it. It forms a tray around the frame and lets any water that gets under the tiles run down and out, rather than soaking into the timber.
If the collar is skipped or the underlay is cut crudely, water that finds its way past a tile has nowhere to go. It tracks along the frame and shows up as a stain on the lining of the room weeks later, often far from where it started. This is a quiet failure, which is why it deserves a place in a guide about flashing kits.
The insulation collar is a separate matter. It fills the gap between the frame and the roof structure, limits cold bridging and helps the window meet current energy requirements. Both collars are fitted in the right order with the flashing. They are not extras to be added to the quote later. For more on the energy side, see our page on energy efficient rooflights.

Fitting order, bottom to top
The flashing goes on in a fixed sequence, and the sequence follows the way water runs.
- Frame first. The window frame is fixed to the rafters and set to the roof plane.
- Underlay collar. The membrane is closed around the frame so any water behind the tiles is carried clear.
- Bottom apron. It goes on first because everything above has to lap over it.
- Side flashings. They are lapped with the tiles beside the frame, working from the bottom up.
- Top flashing. It closes the head, with the tiles above lapping over it.
- Sash last. The glazed sash is hung once the weathering is complete.
Reverse any of these and the laps point the wrong way. Water then runs into the joint instead of over it. That is why the order matters more than the brand of the metal.
Replacing an old window: the old flashing is not reused
A like for like replacement is the situation where flashing is most often misjudged. The old frame is out, a new frame is going in, and the old metalwork looks serviceable. It is not worth reusing. Old flashing has been folded, nailed and bent to the old frame, and it is a different size from a modern kit if the window model has changed. A new kit is cut to the new frame and supplied as a matched set, and the new window is only designed to seal properly with it.
A whole new roof window unit, flashing included, counts as building work and is notifiable, and it has to meet the Part L limit of 1.4 W/m²K or Window Energy Rating band B. The notification to Building Control is ours to make. The detail is in our Building Regulations explainer for skylights and rooflights. To see how a replacement runs from start to finish, read replacing an old VELUX window.
Lead flashing and when a kit is not enough
Standard kits cover the common cases. A few roofs fall outside them. A window set tight against a chimney or a parapet, one that sits across a valley, or one set into a roof with an unusual covering may need bespoke lead work in place of, or alongside, the kit. Lead is cut, dressed and fixed on site. It suits awkward junctions because it can be shaped to the exact line of the roof.
The same applies to the butterfly roofs and parapet-edged roofs that are common on Brighton and Hove terraces, where a window or rooflight may sit close to a valley gutter or an upstand. Your surveyor looks at those details on the roof and says in the quote whether the standard kit is enough or whether lead is needed at one edge.
Reading the size code on the kit
Every flashing kit is made for a window size, and the size is a code of letters and digits. In a VELUX code, the letter stands for the width and the digits for the height. A kit marked for one code will not fit another. If you are not sure what your existing window is, the code is printed on a label on the frame, usually on the side of the sash when it is open. Our page on VELUX size codes explained shows how to read it.
If you are changing size, the kit changes too. A larger window means a larger opening, which means cutting back the tiles and rafters, and the flashing is ordered to the new code. This is part of how the quote is built, and it is explained in how much it costs to fit a VELUX window.
Getting the right window type and kit together
The kit is picked once the window type is settled. Different window types sit differently in the roof, and some are made for particular pitches or openings. Before the flashing is ordered we confirm the model, the size and the covering, then order the three together. If you are still deciding between models, read VELUX window types: GGL, GGU, GPL and GPU.
What goes wrong when the kit is wrong
A mismatched or poorly fitted kit shows up in a handful of ways. None of them are dramatic on the day, which is why they get missed.
- Staining on the plasterboard lining, usually at one corner of the reveal.
- Damp timber around the frame, found when the lining is opened up.
- Tiles or slates sitting proud or tilted beside the frame.
- Water marks that appear after wind-driven rain from one direction only.
The remedy for a window that was fitted with the wrong kit is rarely a small one. The tiles around the frame come off, and the weathering is redone with the right kit. For a window that has failed more generally, how we assess and replace one is covered under misted and failed rooflights.
Access to the roof for this work
Flashing is fitted on the outside of the roof, so it has to be reached safely, whether through the opening or from a platform. On a tall Brighton terrace that can mean a scaffold on the pavement or a tower from the street, and the council's licence for it comes before any work starts. We make the applications for the council licence and for any parking bay suspension. How we reach the roof, the licence and the notice to neighbours are all written into the access plan that comes with the quote. For flats, the roof may belong to the freeholder, so check rooflights in flats and leasehold buildings before you plan the work.
What you get in the quote
The quote says which window model and size are being fitted, which roof covering the kit is matched to, whether the collars and any lead work are included, and what happens to the covering around the opening. It is fixed and in writing. If the roof turns out to differ from the survey, we explain the change before work goes on. Our 10-year workmanship guarantee applies to the flashing and fitting.
To have a flashing kit specified from a real survey of your roof, request a free survey. For the wider picture, return to VELUX windows in Brighton and Hove.